John cooper works uitlaat

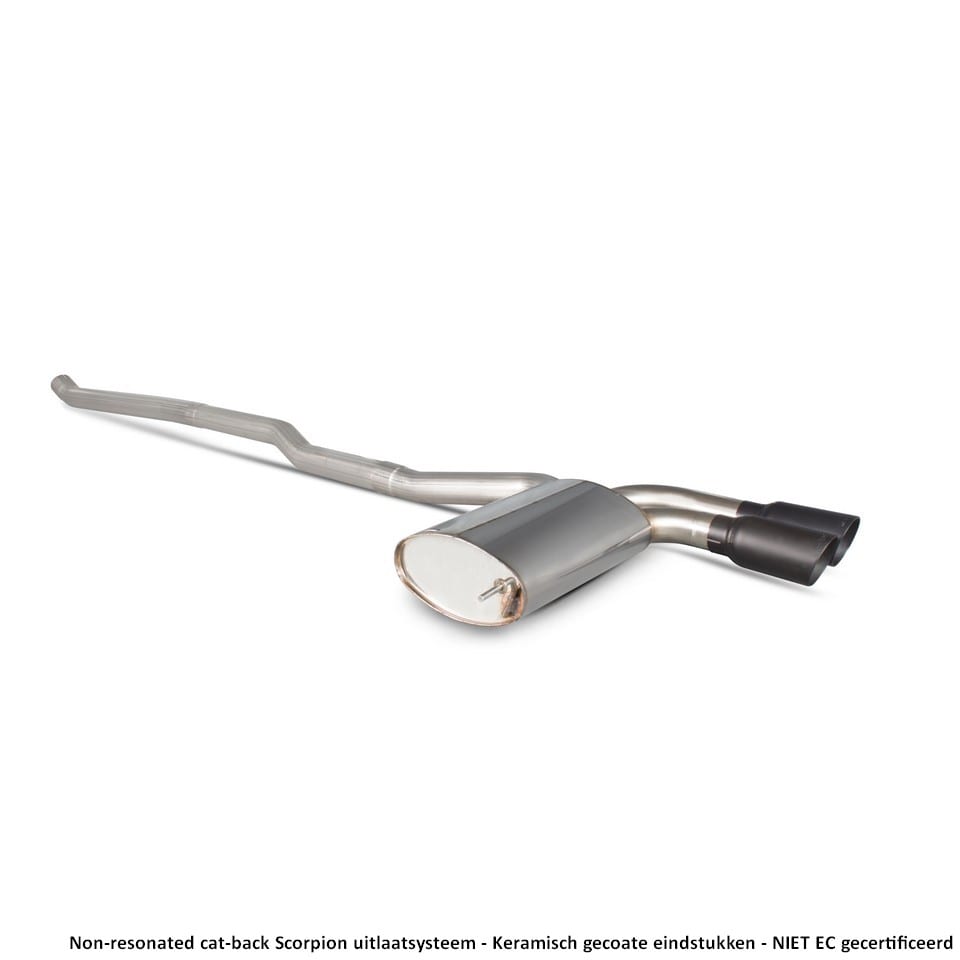
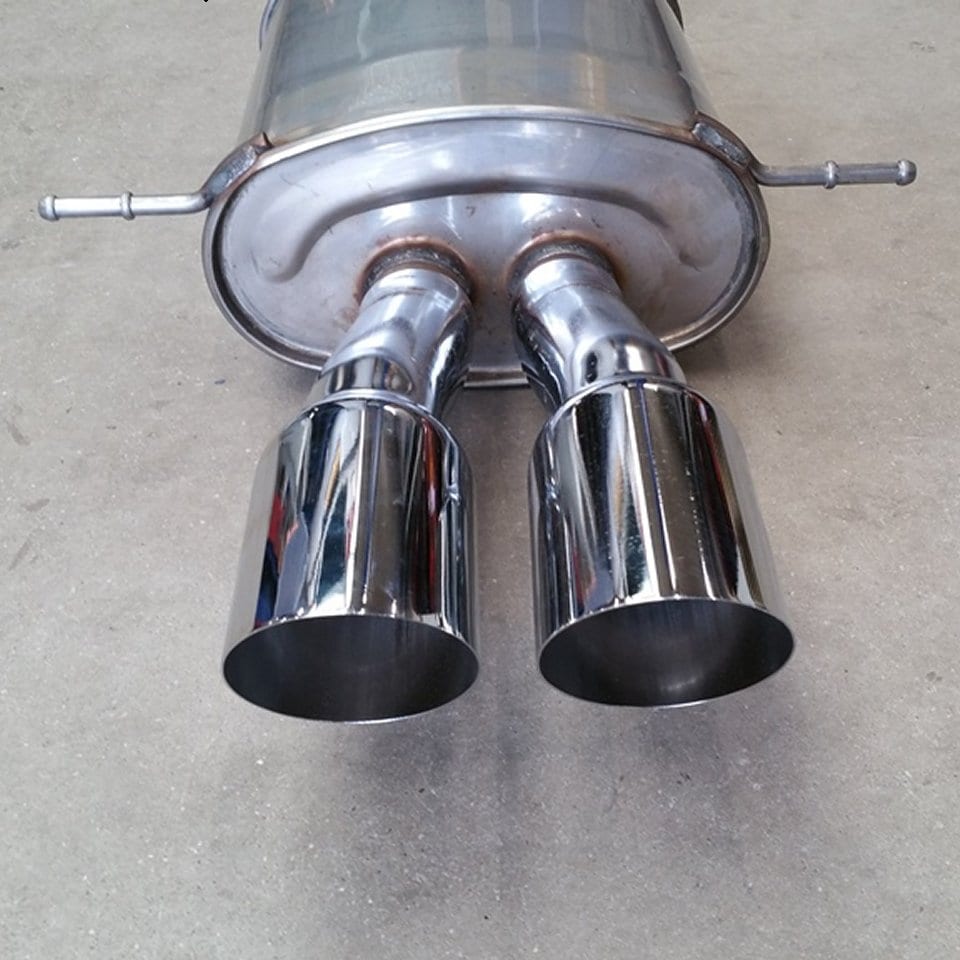
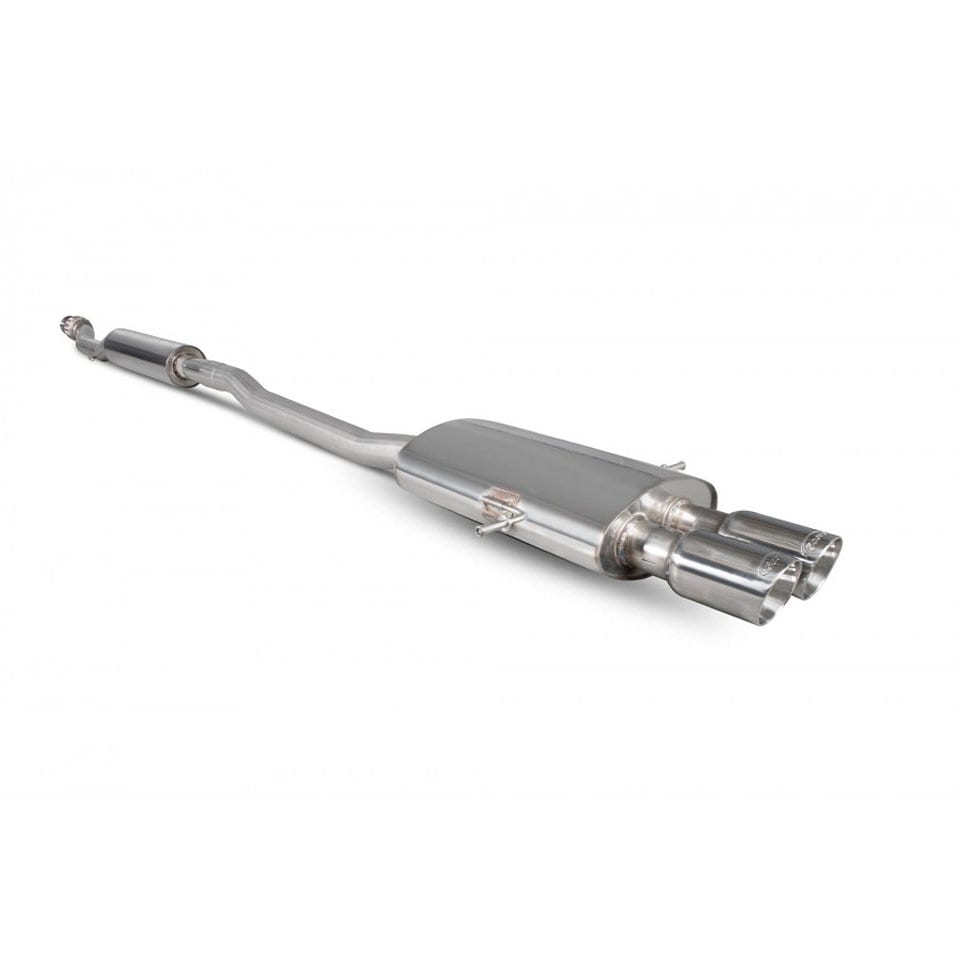
Правила и условия Политика конфиденциальности Советы по безопасности Отзывы об Autoline. Is this content inappropriate? Klemmen Sie das Versorgungskabel mit Hilfe der mitgelieferten Kabelklemme an der Verschlusskappe fest. De standaard Thunder Grey lak is voorzien van een zeer exclusieve carwrap in de kleur Olea Green, al het chroom is hoogglans zwart gemaakt, de wielen zijn zwart gemaakt, er is een Maxton Design bodykit gemonteerd en de JCW uitlaat zit er onder.
To avoid any possible damage to the mixer units taps or shower it is necessary to drain any impurities from the pipes.
Electrical connection It is mandatory, before installing the appliance, to perform an accurate control of the electrical system by verifying compli- ance with current safety standards, which is adequate for the maximum power absorbed by the water heater refer to the data plate and that the section of the cables for the electrical connection is suitable and complies with local regulations.
The manufacturer is not liable for damage caused by lack of grounding or anomalous power supply. Before starting up. The use of multiplugs, extensions or adaptors is strictly prohibited. It is strictly forbidden to use the piping from the plumbing, heating and gas systems for the appliance earthing con- nection.
If the appliance is supplied with a power supply cable, should the latter need replacing, use a cable featuring the same characteristics type H05VV-F 3x1.
The power cord H05VV-F 3x1 mm2 dia. Before starting up the appliance, check that the power rating matches that given on the nameplate. If the appliance is not supplied with a power supply cable, choose one of the following installation modes: - connection to mains with a rigid pipe if the appliance has no cable clamp ; use a cable with a minimum 3x1.
Testing and ignition of the device Before powering up the appliance, fill the heater with mains water. To do so, open the mains cock and the hot water tap until all the air has been vented from the boiler. Check for leaks from the flanges, tighten down the fittings not too much! Turn on the appliance with the switch. Caution: disconnect the appliance from the mains before conducting any maintenance work. Emptying the appliance To drain the appliance, proceed as follows: - close the tap, if installed D Fig.
Replacing parts Fig. To work on the electronic thermostat Ref. T , disconnect the power supply cable Ref. C and the control panel wire Ref. Next, remove it from its slot, taking care not to bend the sensor support rod too much. To work on the control panel Ref. W , disconnect the wire Ref. Y and loosen the screws.
During reassembly, make sure that all components are put back in their original positions. In order to work on the heating element and the anode, the appliance must first be emptied. Undo the 5 bolts C fig. The heating element and anode are attached to the flange. During reassembly, make sure that the flange gasket, the thermostat and the heating element are put back in their original positions Fig.
We recommend replacing the flange gasket Z Fig. Use only original parts from authorized service centres authorized by the manufacturer. Periodical maintenance The heating element R fig. The magnesium anode N fig. In the presence of aggressive or waters rich in chloride it is recommended to check the status of the anode annually.
To remove this, disassemble the heating element and unscrew from the support bracket. Reset: to reset the appliance, switch the product off and on again using the button Ref. If the cause of the mal- function disappears immediately following the reset process, the appliance will resume normal operation. Diagnostics: to enable the diagnostic function, hold the button Ref. A for 5 seconds.
The type of fault is indicated by five LEDs Ref. Exit the diagnostic function by pressing the button Ref. A or wait for 25 seconds. The cycle starts at the first ignition of the product and after each re-ignition which follows a lack of mains power.
When the product is off, the anti- legionella function is not active. If the appliance is switched off during the anti-legionella cycle, the product turns off and the function is not completed. At the end of each cycle, the operating temperature returns to the value set previously by the user. Adjusting the temperature and activating the functions Fig. A to switch on the appliance. During the heating phase, the LEDs Ref. If the temperature drops, for example after hot water has been used, the heating is reactivated automatically and the LEDs between the last fixed light and the light corresponding to the set temperature will resume flashing progres- sively.
In the event of a power failure or if the product is switched off using the button Ref. A , the most recently set tempera- ture remains memorised. During the heating phase, a slight noise may be produced as a result of the water heating process.
If the function is activated the led will be switched on. The Eco function aims to produce hot water by learning the user habits. So, for the first week ever the product memorize the tappings and the periods in which those tappings take place. From the following weeks the water heating is performed regarding what learned previously.
If the user wants to reset the function and start a new learning period, it is necessary to press the ECO button for 3 seconds the eco led will appear blinking. The quantity of hot water is determined by internal parameters and varies according to the model.
If the function is active, the LED will be lit. Each press of the button increases or decreases the set temperature by 10 degrees. After 5 seconds without any action, the set-point will be confirmed and memorised. This status is indicated by the flashing of the temperature LEDs fast if the product is on, slow if it is off. After 25 seconds, the system will return to the stall status.
Do not use insecticides, solvents or aggressive detergents that may damage the painted parts or plastic material. If the water delivery is cold, have the following checked: - that the device is connected to the power supply and the external switch is in the ON position.
If there is presence of steam output from the taps: Remove power from the electrical appliance and contact technical support.
If the hot water delivery is insufficient, have the following checked: - the pressure of the water mains; - eventual obstruction of the inlet and outlet pipes deformation or sediment. Water trickling from the pressure safety device During the heating phase, some water may trickle from the tap. This is normal. To prevent the water trickling, a suitable expansion vessel must be installed on the flow system. If the trickling continues even after the heating phase, have the following checked: - device calibration; - the pressure of the water mains.
Caution: Never obstruct the appliance outlet!

The indicated data and specifications are not binding; the manufacturer reserves the right to modify them at his own discretion notification or replacement. The symbol of the crossed waste paper basket on the appliance and its packaging indicates that the product must be scrapped separately from other waste at the end of its service life. The user must therefore hand the equipment over to a sorted waste disposal facility for electro-technical and electronic equipment at the end of its service life.
Alternatively, he may return the equipment to the retailer at the time of purchase of a new equivalent type of appliance. Electronic equipment of size less than 25 cm can be handed over to any electronics equipment retailer whose sales area is at least m for disposal free of charge and without any obligation to purchase new product.
Y du tableau de commande. A pendant 5 secondes. A ou attendre pendant 25 secondes. El presente manual es parte integrante y esencial del producto. Utilice exclusivamente repuestos originales. El incumplimiento de lo anterior puede comprometer la seguridad y exonera al fabrican- te de cualquier responsabilidad. Debe estar conectado a una red de suministro de agua sanitaria dimensionada en base a sus prestaciones y capacidad.
Se aconseja instalar el aparato A Fig. Por eso no se aconsejan materiales que no resistan dichas temperaturas. En dicho racor atornille por una parte un grifo para el vaciado del termo B Fig. Al atornillar el grupo de seguridad, no lo fuerce hasta el tope ni los altere o manipule. Encienda el aparato accionando el interruptor. C y el cable Ref. Y del panel de mandos.
Luego extraerlo cuidando no flexionar demasiado la varilla que contiene los sensores Ref. Para intervenir en el panel de mandos Ref. W desconecte el cable Ref. Y y desenrosque los tornillos. Desenrosque los 5 pernos C Fig. Use solo recambios originales provenientes de los centros de asistencia autorizados por el fabricante. A o espere 25 segundos. Al final de cada ciclo, la temperatura de uso vuelve al valor previamente configurado por el usuario. Durante la fase de calentamiento los ledes Ref.
Durante la fase de calentamiento puede haber un ligero ruido debido al calentamiento del agua. Esvaziamento do aparelho Esvaziar o aparelho adotando o procedimento abaixo: - se tiver uma torneira de isolamento instalada D fig. Y do pai- nel de controlo. Para agir sobre o painel de controlo Ref. W desligar o cabo Ref. Y e retirar os parafusos. Desapertar os 5 parafusos C Fig. Reset: para proceder ao reset do aparelho, desligar e ligar o produto com a tecla Ref. A ou esperar por 25 seg.
No decorrer da fase de aquecimento, os sinais luminosos Ref. C a kabel Poz. W odpojte kabel Poz. A na dobu 5 sekund. Bestandteile der Verpackung Klammern, Plastikbeutel, Styropor usw. Achten Sie daher vor dem Bad oder der Dusche auf die Wassertemperatur. Wir empfehlen den Einsatz von Haken, die der jeweiligen Beschaffenheit der Wand, an die der Speicher instal- liert wird, entsprechen und einen Mindestdurchmesser von 12 mm aufweisen. Um die verschiedenen Wartungseingriffe zu vereinfachen, muss im Innern der Kappe einen Freiraum von mindestens 50 cm vorgesehen werden, um auf die elektrischen Teile Zugriff zu haben.
Beim Anschrauben darf die Sicher- heitseinheit nicht mit Gewalt bis zum Anschlag gedreht und nicht manipuliert werden.
Klemmen Sie das Versorgungskabel mit Hilfe der mitgelieferten Kabelklemme an der Verschlusskappe fest. Eventuelles Auswechseln von Bauteile Abb. Zur Arbeit am elektronischen Thermostat Bez. C und das Kabel Bez. Y der Bedienblende getrennt werden. Ziehen Sie das Thermostat heraus.
K nicht zu stark biegen. Zur Arbeit an der Bedienblende Bez. W trennen Sie das Kabel Bez. Der Flansch ist mit dem Widerstand und der Anode gekoppelt. Bei jedem Ausbau sollte die Flanschdichtung Z Abb. Nur originale Ersatzteile von vom Hersteller autorisierten Kundendienststellen verwenden. Die Magnesiumanode N Abb. A aus und wieder ein. Andernfalls fangen alle LEDs wieder an zu blinken. Wenden Sie sich in diesem Fall an den Kundendienst.
A oder warten Sie 25 Sek. Der Zyklus startet bei der ersten Inbetriebnahme des Produkts und nach jedem erneuten Einschalten nach einem Stromausfall. Wenn die Temperatur sinkt, beispielsweise durch Entnahme von Wasser, startet die Heizphase automatisch und die LEDs zwischen dem letzten fest leuchtenden und dem, der die eingestellte Temperatur anzeigt, beginnen erneut progressiv zu blinken. A ausgeschaltet wird, dann bleibt die zuletzt eingestellte Temperatur gespeichert.
In der Heizphase bleibt die Kontrollleuchte eingeschaltet. Ist die Funktion aktiviert, leuchtet die LED. Die Funktion Eco zielt darauf ab, Warmwasser zu erzeugen, indem sie die Gewohnheiten des Benutzers erlernt. Die Warm- wassermenge wird auf Grundlage von internen Parametern festgelegt und kann je nach Modell variieren. Wenn die Funktion aktiviert ist, leuchtet die LED auf. Dieser Zustand wird durch das Blinken der Temperatur-LED angezeigt schnelles Blinken, wenn das Produkt einge- schaltet ist, langsam, wenn das Produkt ausgeschaltet ist.
Im Falle von unzureichender Warmwasserabgabe, sicherstellen, dass: - den Wasserdruck; - die Eingangs- und Ausgangsleitungen des Wassers nicht verstopft sind Verformungen oder Ablagerungen. Bei den Daten und Eigenschaften handelt es sich um unverbindliche Angaben.
Rekomenduojame naudoti bent 12 mm skersmens kablius. Magnio anodas N 7 pav. Magnija anods N 7. Kasutada tohib ainult originaalvaruosi.
Seadme vee sisselasketorule tuleb kohustuslikult kinnitada riiklikele eeskirjadele vastav kaitseklapp. See on ohtlikum laste, puuetega inimeste ja vanurite jaoks. Soovitame paigaldada seade A Joon.
T liitmiku teise otsa keerake kaasas olev kaitseventiil A joonis 2. Ohutusseadme ja boileri vahel on keelatud kasutada mistahes sulgeseadmeid klappe, kraane vms. Kasutage ainult tootja volitatud teeninduskeskustest saadud originaalvaruosi. Magneesiumanood N joon. Diagnostika: diagnostikafunktsiooni aktiveerimiseks vajutage nupp osa A 5 sekundiks all. Kuumdesifintseerimise funktsioon legionella-vastane Legionella-vastane funktsioon on aktiivne vaikimisi.
Внимательно прочесть инструкции и предупреждения, которые приводятся в данном руководстве, так как дают важные указания относительно безопасной установки, эксплуатации и техобслуживанию. Настоящая брошюра является неотъемлемой и важной частью изделия. Завод-изготовитель не несёт ответственности за урон, нанесённый людям или животным, а также имуществу при несанкционированной эксплуатации или при несоблюдении инструкций, приведённых в данной брошюре.
Установка и техобслуживание приборы должны быть выполнены квалифицированным персоналом, как описано в соответствующих параграфах. Использовать исключительно оригинальные запчасти. Несоблюдение приведённой выше информации может негативно повлиять на безопасность и привести к отмене ответственность изготовителя. Упаковочные элементы скобы, пластиковые пакеты, вспененный полистирол не должны быть оставлены доступными для детей, так как являются источником опасности.
Оборудование может быть использовано детьми возрастом моложе 8 лет, лицам с пониженными физическим, умственными или сенсорными способностями, а также, без необходимого опыта или необходимых знаний, если находятся под контролем или получили необходимые инструкции по безопасной эксплуатации прибора и усвоили риски, которые их касаются. Дети не должны играть с прибором. Очистка и техобслуживание должны выполняться пользователем и не должны выполняться детьми под контролем.
Запрещено касаться прибора босиком или если кожа частично влажная. Перед тем, как использовать прибор и в ходе работ по плановому и внеплановому ремонту следует наполнить водой бак водонагревателя и еще раз полностью спустить воду с тем, чтобы избавиться от остатков грязи. Если прибор оснащён кабелем электропитания, в случае его замены обратиться в уполномоченный сервисный цент или к квалифицированному персоналу.
Необходимо привинтить водную трубу на входе прибора с помощью предохранительного клапана, в соответствии с национальными стандартами. Для стран, где действует стандарт EN , блок безопасности должен иметь максимальное давление 0,7 MПa, должен включать не менее одного отсекающего клапан, запорный клапан, предохранительный клапан, отсекающее устройства гидравлической заправки.
Предохранительное устройство от повышенного давления клапан или предохранительный узел не должен быть разобран или должен периодически запускаться в работу чтобы проверить, что нет блокировки и для удаления следов накипи.
Капание с устройства против повышенного давления - нормальное явление на этапе нагрева воды. По этой причине необходимо подключить слив, при этом оставить его постоянно открытым для атмосферы, с дренажной трубой, установленной под постоянным уклоном, в помещении, где отсутствует обледенение.
Необходимо опорожнить прибор, отключить от сети электроснабжения, в период простоя если в помещении есть риск замораживания. Дети, инвалиды и пожилые люди больше всего подвержены данному риску. Поэтому, рекомендуется использовать смесительный термосатический клапан, который привинчивается к трубе на выходе воды из прибора, отмечается красным хомутом. Не должно быть воспламеняющихся элементов в контакте или вблизи с прибором. Не находится под прибором и не размешать какой либо предмет, который может, например, быть повреждён утечкой воды.
Болезнь от legionella заключается в особом виде воспаления легких от испарений воды, содержащей эти бакте- рии. По этой причине необходимо избегать длительного застоя воды в водонагревателе, который, следователь- но, после использования необходимо либо использовать, либо опорожнять не реже 1 раза в неделю.
Данный электронный водонагреватель использует автоматическую бактерицидную функцию для воды, активи- рованную по умолчанию. Внимание: в процессе выполнения цикла термической бактерицидной функции высокая температура воды мо- жет привести к ожогам.
Проверяйте всегда температуру воды перед принятием душа или ванны. Устройство оснащено смарт-функцией, что позволяет адаптировать энергопотребление к эксплуатаци- онному профилю пользователей. По завершении установки и перед любым заполнением воды и подключением электропитания, использовать контрольный инструмент напри- мер, ватерпас чтобы проверить правильной установки. Прибор необходим для подогрева воды при тем- пературе, ниже температуры кипения.

Он должен быть подключен к сети подачи сантехнической воды, в соот- ветствии с эксплуатационными качествами и объёмом. Перед тем, как подключить прибор, необходимо: - Проверить, что характеристики см. Данные прибор разработан для установки исключительно во внутренних помещениях в соответствии с действу- ющими нормами, а также,следовать предупреждениям по наличию: - Влажность: не устанавливать прибор в закрытых не проветриваемых и влажных помещениях.
Если стены выполнены из кирпичей или перфорированных блоков, перегородок с ограниченной статичностью или из кладки отличной, от указанной выше, необходимо выполнить предварительную статическую проверку опорной системы.
Крюки крепления к стене должны быть таковыми, чтобы выдерживать тройной вес водонагревателя, заполнен- ного водой. Рекомендуется использовать крюки диаметром не менее 12 мм. Рекомендуется установить прибор A рис. Местные нормы могут предусматривать ограничения для установки прибора в ванную комнату, следовательно, соблюдать минимальные расстояния, предусмотренные нормативными требованиями.
Для удобного проведения операций техобслуживания, обеспечить свободное пространство вокруг обшивки не менее чем 50 см от электрических компонентов. Поэтому, не рекомендуют- ся материалы, которые не выдерживают такие температуры. Привинтить входную трубу воды к прибору. На настоящий переходник привинтить с одной стороны вентиль для слива водонагревателя B рис. Предохранительный блок соответствует Европейскому Стандарту EN В некоторых странах требуют применения специальных предохранительных устройств согласно положениям местных законов; задача приглашенного квалифицированного монтажника состоит в том, чтобы оценить при- годность предохранительного устройства для использования в данной ситуации.
Запрещено устанавливать любое отсекающее устройство клапаны, вентили и т. Сливное отверстие устройства должно быть подсоединено к сливной трубе равного либо большего диаметра через воронку, при помощи которой образуется зазор, как минимум, 20 мм для визуального контроля.
С помо- щью шланга подключить к трубе холодной воды в сети, подача на предохранительный узел, при необходимости, использовать отсекающий вентиль D рис. А также, в случае открытия сливного крана, установить сливной шланг воды, установленный на выходе C рис.
Не привинчивать предохранительный узел, не форсировать концевой выключатель и не разбирать его. Если необходимо установить узлы смесителей комплект кранов или душ , необходимо выполнить стравливание трубопровода и загрязнений, которые могут вызвать повреждения.
Электрическое подключение Необходимо перед тем, как установить прибор, выполнить тщательную проверку электросистемы, проверяя со- ответствие действующим правилам безопасности, соответствие макмимальной потребляемой мощности нагре- вателя воды смотреть данные на табличке и что сечение соединительных кабелей соответствует действующим нормативным требованиям.
Изготовитель прибора не несёт ответственность за урон, нанесённый отсутствием заземления или сбоями электро- питания. Перед запуском в эксплуатацию, проверить, что напряжение в сети соответствует значению на табличке приборов.
Запрещено использовать электрические распределители, удлинители и адаптеры. Запрещено использовать трубы гидравлической установки, отопления или газа для подключения заземления при- бора. Если прибор поставляется с кабелем электропитания, в том случае, если необходимо его заменит, необходи- мо использовать кабель с идентичными характеристиками тип H05VV-F 3x1,5 мм2, диаметр 8,5 мм. Кабель электро- питания тип H05VV-F 3x1,5 мм2, диаметр 8,5 мм должен быть введён в специальное отверстие, которое находится в задней части прибора и провести до достижения клемм термостата M рис.
Для отключения прибора от сети необходимо использовать двухполюсный выключатель, которые отвечает дей- ствующим стандартам открытие контактов не менее чем на 3 мм, рекомендуется установка плавких предохрани- телей. Заземление является обязательным: кабель заземления, который должен быть желто-зеленого цвета и превы- шать по длине фазные кабели, крепится к клемме с символом G рис.
Если прибор не оснащён кабелем электропитания, способ установки должен быть выбран среди следующих: - подсоединение к фиксированной сети посредством жесткой трубы если прибор не оборудован зажимом ; ис- пользовать кабель с минимальным сечением 3x1,5 мм2; - с помощью гибкого кабеля типа H05VV-F 3x1,5 мм2, диаметром 8,5 мм , если прибор оснащён кабеледержате- лем.
Проверочные испытания и включение прибора Перед тем, как включить прибора, заполнить контур проточной водой. Настоящее заполнение выполняется при открытии центрального вентиля бытовой установки и горячей воды, до выхода всего воздуха из бака. Визуально проверить наличие утечки воды из фланца, при необходимости, затянуть болты, не перетягивая. Включить прибор с помощью выключателя.
Внимание: перед тем, как выполнить любую операцию, отключить прибор от сети электропитания. Слив прибора Приступить к опорожнению прибора, как описано ниже: - Закройте запорный кран, если он установлен D рис. Замена компонентов рис. Чтобы заменить электронный термостат поз. Т , отсоедините питающий кабель поз. С и провода электронной платы поз. Затем осторожно вытащите термостат из отверстия, не перегибая длинную планку, на которой расположены сенсоры поз. Чтобы заменить пулы управления поз.
W , отсоедините провода поз. У и раз- винтите шурупчики. Во время нового монтажа особое внимание следует обратить на то, чтобы все компоненты были установ- лены на свои изначальные места. Чтобы выполнить какие-либо работы на нагревательном элементе и аноде, необходимо предварительно опу- стошить прибор.
К фланцу подсоединены нагревательный элемент и анод. Во время нового монтажа особое внимание следует обратить на то, чтобы уплотнитель фланца, термостат и на- гревательный элемент были установлены на свои изначальные места.
Каждый раз после удаления рекомендуется заменить уплотнитель фланца Z, рис. Используйте только оригинальные запасные части от авторизованных сервисных центров производи- теля. Плановое техническое обслуживание Для обеспечения хорошей производительности прибора выполнять процедуру удаления накипи с нагревательно- го элемента R рис. Если не используются специальные жидкие средства в данном случае внимательно прочесть технические карточ- ки антинакипана , можно раскрошить твёрдое образование накипи, будьте осторожны, чтобы на разрушить нагре- вательный элемент.
Магниевый анод N рис. При наличии агрессивной воды или обогащённой хлоридами, рекомендуется проверять состояние анода каждый год. Для замены анода необходимо сначала демонтировать ТЭН, а затем открутить сам анод от крепежной пластины.
Перезапуск: для перезапуска выключите и снова включите прибор, используя кнопку поз. В случае, если не- исправность может быть ликвидирована в процессе переэагруэки, то водонагреватель вернется в нормальный режим работы. В противном случае, индикаторы продолжат мигать. В этом случае обратитесь в авторизованный сервисный центр.
Диагностика: для активизации функции диагностикинажмите и удержите кнопку поз. А в течение 5 секунд. Противотуманные фары:. Дополнительная комплектация Легкосплавные диски:. Дополнительная информация Цвет: черный, металлик.
Al onze prijzen zijn exclusief BTW, mits anders vermeld in de advertentie!! Derks Bedrijfswagens heeft een ruim aanbod bedrijfswagens: bestelbussen, koel- en vrieswagens.
Alle merken en modellen. Nieuwe en jong gebruikt. We hebben zelfs elektrische vrachtfietsen met het laadvolume van een kleine bestelauto. Daarnaast hebben we twee eigen werkplaatsen, waar alle type bedrijfswagens terecht kunnen.
Al ruim 30 jaar verzorgen wij hier onderhoud, reparatie en de APK. En wij hebben al even lang ervaring in het aanpassen, in- en ombouwen van bedrijfswagens. Door vijf eenvoudige stappen helpt Derks Bedrijfswagens u bij het verwerven van de ideale bedrijfswagen voor uw onderneming: Stap 1. Selecteer de bedrijfswagen die past bij de onderneming; Stap 2.
Maak de bedrijfswagen compleet met opties en accessoires die wij ook kunnen monteren; Stap 3. Sluit indien gewenst een bedrijfswagenverzekering bij ons af; Stap 5. Laat het onderhoud over aan onze gecertificeerde werkplaatsmedewerkers. Советы по покупке. Контакты продавца. Derks Bedrijfswagens Верифицированный дилер. В продаже: объявлений. Телефоны проверены. Адрес проверен. Bart Derks. Языки: английский, немецкий, нидерландский. Om het helemaal af te maken is de MINI uitgerust met een zwart dak, zwarte spiegelkappen en privacy glas.
Alleen optisch straalt deze JCW de sportiviteit al uit. Ook is het interieur volgeladen met opties. Hier gaat het gelukkig om een rasechte JCW versie. Dus pk, een sportief uitlaat geluid en een onwijs sportieve handeling. Heerlijk toch? De Mini Cooper was vroeger een sportieve versie van de Mini die was gebaseerd op de standaard Morris ontworpen door Alec Issogonis.
Sport- en racewagenconstructeur John Cooper gaf de motor, chassis en uitrusting een aanpassing voor de rally en racerij. De Mini Cooper werd met name bekend door in de jaren 60 drie keer de Rally van Monte Carlo te winnen.
De Mini was succesvol en John Cooper zag mogelijkheden voor race- en rallydoeleinden. Technisch aangepast en een opgeboorde motor tot van cc naar cc waardoor de Mini opeens 55pk had tov de oorspronkelijke 34 pk. Verder werd een close ratio versnellingsbak gemonteerd en de voorwielen kregen schijfremmen.
Later is het vermogen een S zelfs teruggebracht naar pk, dank aan de milieueisen. Verder een aangepaste ophanging, een electronisch sperdifferentieel en Brembo remmen om al het geweld op straat te krijgen en te houden! Uiteraard word je door speciale sportstoelen een fraaie combi van Alcantara, stof en leder stevig vastgehouden komt ook het oog niks te kort met de bodykit en extra dikke velgen. U bent van harte welkom, wij zijn uitsluitend op afspraak geopend. Er kunnen echter geen rechten worden ontleend aan de verstrekte informatie in de advertentie.